
A new Airbnb or short-term rental venture can yield great financial returns – even without necessarily requiring any investments on your end. There are a number of roads you can go down to achieve success and maximize the benefits of short-term rental hosting, and they all begin with knowing how to list your property on Airbnb.
Here is a step-by-step guide to take you through the process of crafting and perfecting your new Airbnb listing from start to finish. Once the listing is up, and your rental is ready to receive guests, we will be here to guide you to hosting success – you can hand Guesty the keys to drive your Airbnb listing towards more bookings, automated and streamlined management, and more time to spare. If you are just getting started, Guesty has everything you need to sit back and run your hosting on autopilot, so click the link below to find out more.
Whether you are new to Airbnb hosting or you already have some hosting experience under your belt, Guesty is here to automate your short-term rental management so you can rest assured you are running your rentals like a 5-star host – with a fraction of the effort.
Getting Started – Creating Your Airbnb Listing
The first thing you need to do if you want to know how to list on Airbnb is to head to airbnb.com and select the ‘Become a host’ option in the top right corner of the homepage. You’ll be directed to another page and a button that says ‘Try hosting.’ You will then be brought through a series of pages prompting you to fill in the details of your Airbnb home. Take note that you can only complete this first form after creating an account, so it may be more efficient to sign up (or login) before you begin. If you have not yet signed up or logged in, you’ll be prompted to input your information at this point.
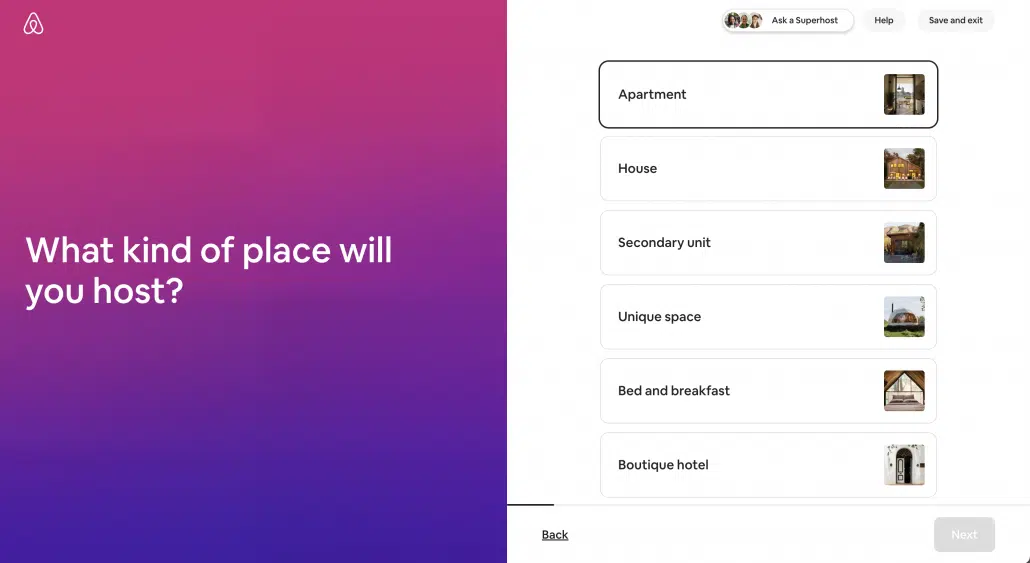
- Home Type: In the first fields required to list your house on Airbnb, you will be prompted to provide more specific details about the type of home you are listing. First, you must select the most accurate description of your property type from a list that includes: apartment, house, secondary unit, unique space, bed and breakfast, and boutique hotel. Once you’ve chosen your listing type, you’ll need to select a more specific description from a second drop-down menu. For example, if you’ve identified your listing as a ‘unique space,’ you’ll need to further specify whether it is a barn, an igloo, a tent, or one of several other options. Based on your selection, another menu will appear for you to fill out.
- Listing Type: You will then be asked to identify the type of shared space you offer. This is an important distinction, whether you are renting out the entire place, a private room, or a shared room. It’s crucial because you or your guests may be particular about maintaining a certain level of privacy, so, make sure that you’re accurately building your listing to attract the most appropriate guests for your property.
- Location: Here you need to type in the address of your listing. You will then be asked to confirm the location and a pin that is created on the map.
- Number of guests: This menu allows you to select the maximum number of people that can comfortably fit in your listing. You are asked to provide the number of guests, beds, bedrooms, and bathrooms offered in your listing. For now, calculate how many people you can accommodate if each has his or her own bed, sofa bed, or inflatable mattress, provided that the sleeping arrangement is as comfortable as you would expect if you were the guest yourself.
- Amenities: Here you can choose from a list of amenities and safety items that guests can find at your property. Selecting the right amenities for your Airbnb is a must. This section has a lengthy list of features that ranges from kitchens to pools to home safety measures. At this stage, you are only given the option to select from the available list of amenities, but once the listing is created you will be able to edit this section and add additional or further descriptions and details. Make sure to include every appropriate feature as some guests can be swayed by certain extras or become totally uninterested due to a lack thereof. If you’re totally lost here, have a look at our Airbnb host Checklist to maximize Airbnb experiences.

Setting the Scene – Airbnb Photos & Description
These next steps in listing your property on Airbnb are those for which you need to employ creativity to make your listing stand out. Here you will be prompted to upload photos of your property, give it a title and write a brief description of the place.
- Photos: Regardless of how many you decide to upload, the first 3 photos are the most important as they frame the window into your listing before users make the decision to click on the post or not. This is all the more reason to offer standout and high-quality pictures. Try to take this opportunity to show off amenities, quirky rooms, or other features unique to your property. Make sure that your photos are clear and high quality. You may want to consider taking the opportunity to invest in a professional photographer.
- Title: You now have 50 characters to name your listing and showcase what makes it special. Think of the title as your first impression. You want to make the title engaging enough to capture attention and unique enough to accurately depict your place. Try using descriptive and pleasant adjectives to cushion your title. Make sure to include some keywords here because this is an area that will contribute to Airbnb’s search function to help guests find matching results.
- Description: A great summary covers the major features of your listing in 500 characters or less. People like a bit of personality, so let yours shine through while explaining exactly what it is that makes your place unique. Too much writing looks daunting, so try to break it up; bullet points and short sentences can go a long way.
Getting Ready for Guests
Pricing Your Airbnb Rental
Now is the time to think economically and set your nightly price. If you don’t know where to start, don’t worry, Airbnb automatically calculates a price range for a typical listing similar to yours based on the information that you’ve provided thus far as well as trends currently shaping the local rental market, such as holidays, increased tourism, and more. You can always change your pricing, so we recommend starting with something on the lower end in order to get some bookings under your belt. It’s important to remain relevant and competitive, so be sure to compare prices of similar Airbnb listings in your area.
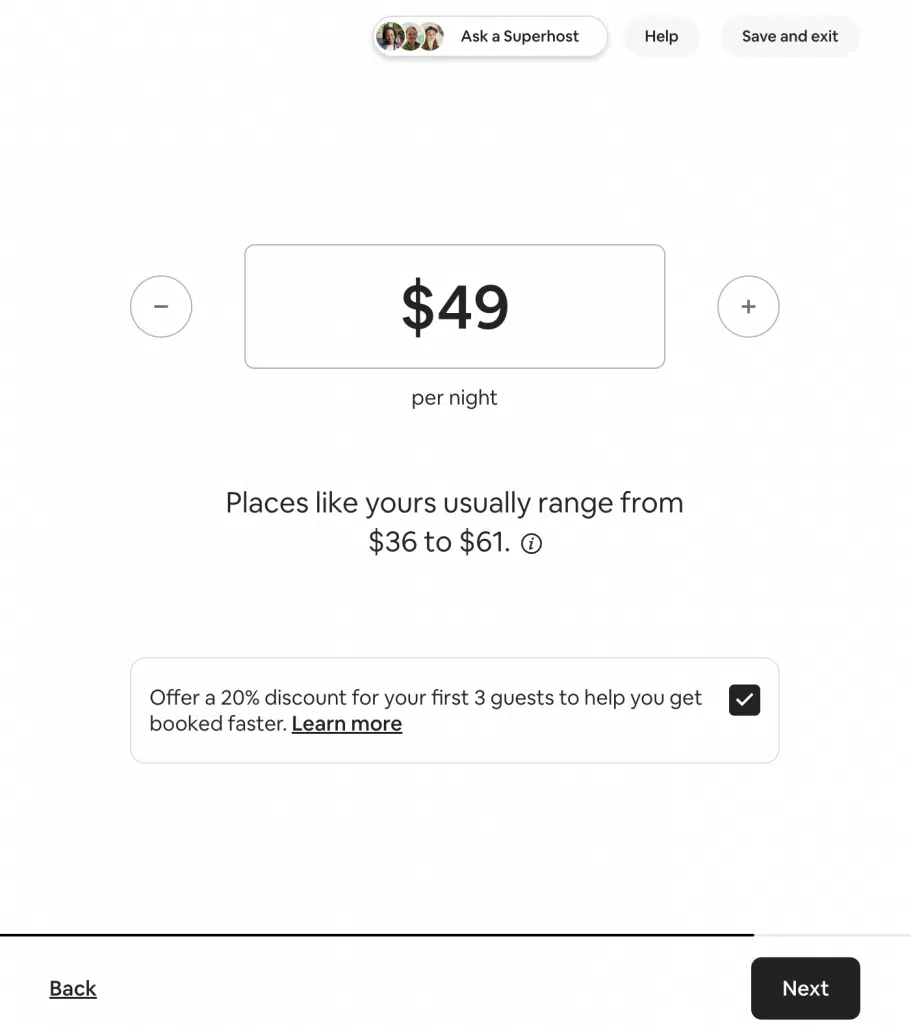
You also have the option to offer a 20% discount to the first three guests to give more incentive and create some action on your listing.
In the future, you can consider using a smart pricing tool, which will automatically update your prices according to the fluctuations of demand in your area. There are many options including Airbnb’s own tool as well as add-on providers that offer more advanced solutions.
Finishing Off your Airbnb Listing
And there you have it! You have now set up your listing! All you have to do is go through a few more steps to confirm details and then you can press the publish button to make your listing live. Following this step, there will be a few more details to tackle. Remember you can always go back and update your listing so don’t hesitate to make it live!
Next Steps
Airbnb Booking Settings
After you’ve set up your listing, you can review Airbnb’s basic guest requirements and opt to make additional requirements such as the provision of a government-issued ID and/or recommendations from other Airbnb hosts and zero negative reviews. You’ll then set your house rules and provide important details about your home, such as whether guests you have a pet policy or if parking is included.
Calendar
Now it’s time to get some bookings! To get started, you’ll select how often you’d like to have guests on your property, how much notice you’ll require before your guests arrive, how far in advance they can book your place and how long they can stay.
Next, you’ll be able to manually flip through your calendar and block or unblock specific dates or even entire months. The specific dates available for rental should be inputted as soon as you publish your listing and should be updated regularly. Now that your calendar is up to date, you are ready to start accepting reservations.
A Few Last Pointers
The first rule of thumb when creating your Airbnb listing is to always be honest in your description. You want to ensure that you are giving a true-to-life description of your property in order to attract the right guests with the right expectations. This is more true now than ever since Airbnb has instituted its’ Get What You Booked Guarantee which will rebook and reimburse guests that have a legitimate claim that they were misled in the booking details. Nevertheless, you do want to make sure that despite being honest, you present your place in as positive a light as possible.
Exhausted? Great news! At this point, you have the option to simplify all of your operations by turning to Guesty, a centralized and intuitive platform for listing optimization, automated guest & staff communication, channel management, and more. Go ahead and check out our mobile-first app with a free 14-day trial!

Guesty’s talented marketing team is comprised of passionate professionals who share insightful industry knowledge and shape brand narratives. By bringing a diverse blend of expertise to the table, we are the visionary architects behind the Guesty brand and innovative campaigns that help people understand our product.